

Show/Hide Container Buttons
Tableau introduced the ability to use a button to show or hide a container and the items within it in version 2019.2, which was released in May 2019. Since then, I’ve used it countless times and it’s one of my favorite features. While there are many uses for the show/hide container function (you can read a number of examples on Kevin Flerlage’s post here), I use them most for collapsable menus, sheet swap, and overlaid instructions.
For September’s #ProjectHealthViz submission on the Global Burden of Alcohol, I used a show/hide button to swap between sheets. The first view was a scatterplot of male and female rates (percent of deaths and prevalence of drinkers) by country and the second was the same chart, but with the lines connected between the male and female points for each country to show the differences between genders.
I also used this technique in two other vizzes recently. One on Autism used the show/hide container to swap between three different analyses. The other was a viz I did on my son’s poor sleeping and I used six show/hide buttons: one for annotations, one for instructions/information, and four others to take you into the “closet” (a light switch, a key hole, and then two buttons to show two different pictures).


Creating a Show/Hide Button
The first thing you need to do is to create your buttons. You will need one that will display when your container is hidden and one that will show up when the container is showing. Usually a different color is helpful for the viewer so they can tell if they have activated the button or not. Tableau will give you a generic button to use, which is an hamburger menu icon and an X icon, or you can create your own in a tool such as PowerPoint. I always create my own button images as it’s very easy and then often just reuse them. Here are the some of the ones I used in the aforementioned vizzes.


These were all created in PowerPoint with shapes and shadows, nothing too complicated. However, you can get really creative and make custom shapes for specific visualizations.
Let’s make the generic button together. Open PowerPoint and follow along in the video.
Now that you have your two buttons ready, you can go into Tableau to set them up.
Setting Up the Show/Hide Container
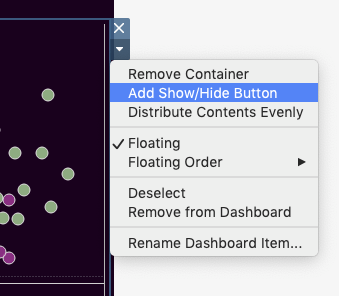
The biggest thing to know about the show/hide container function, is what you are creating is a floating container that will house at least one or more objects (a worksheet, image, etc). This means, the first thing you need to do is to drag out a floating container (horizontal or vertical) onto your dashboard. Then click on the down arrow in the top corner and select, “Add Show/Hide Button”.
As mentioned, a little X icon will show up as the placeholder for your button. You, of course, can use this, but let’s use the buttons we just created.
Click on the down arrow in the corner of the button and select “Edit Button”, which will bring up a window. Here, you can change the image (where it says “Choose and image…”), modify the border or background, and add in a helpful tooltip.

So select the image for the “Item Shown” then repeat the process for “Item Hidden” to get both your buttons set up.
Here is what mine looked like when completed.

Again, there are lots of uses for these so check out my other vizzes for examples! I hope that was helpful.
Cheers!
Lindsay
P.S. Don’t forget to check out the other awesome submissions from September below!
September’s Community Submissions on The Global Burden of Alcohol


You can find all the links to these vizzes and more via the Submission Tracker.

One comment